
Let's Make Ornaments:
I have three different types I've made. All are fairly easy enough for kids or adults alike. Let's get started, shall we?
I have three different types I've made. All are fairly easy enough for kids or adults alike. Let's get started, shall we?
Glitter Ornaments:
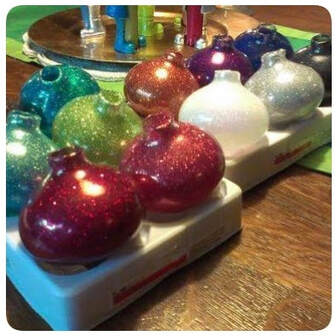
Supplies:
*Rubbing Alcohol
*Glitter
*Glass (or plastic) Christmas Ornaments
*Pledge Multi-Surface Floor Finish
Directions:
Remove the metal caps from the tops of the ornaments. Drop a little rubbing alcohol in there and swirl that around, being sure to coat the entire interior surface, then pour out. Next add a little floor finish inside the ornament, & repeat the same process, coating the entire interior surface, then pouring it out. Then add the glitter, be sure to coat the entire interior surface, then pour out excess glitter. Allow to dry for about an hour to be on the safe side, then insert the tops back in.
Notes:
I'd found this DIY on the internet, but do not remember exactly from where. The alcohol is to make sure the interior is clean. It was called Pledge Future Shine at the time that I made these, but it's now called Multi-Surface Floor Finish. I purchased the ornaments & the glitter at Michael's. I found that the little packages of glitter in the kids craft section worked perfectly. Cheap, easy to pour in, about the right amount, & each package was a different, beautiful colour.
The Trouble With Tribbles:
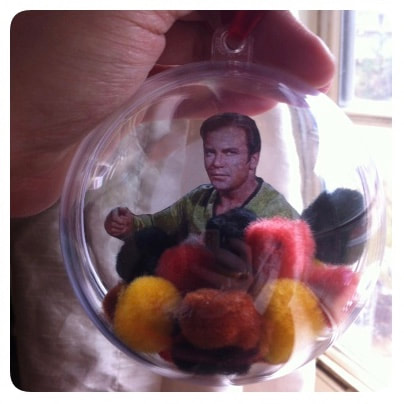
Supplies:
*Plastic ornament that opens in half
*Print out of Kirk
*Scissors
*Clear Tape
*Pom Poms
*Ribbon
Directions:
Find an appropriate photo online of Captain Kirk (or other Star Trek Original Series cast member, from the episode The Trouble with Tribbles) & print that out, making sure it will fit inside your ornament. Use scissors to cut around Kirk and leave about half inch of paper at the bottom (to fold). Fold that half inch bit backwards, using it to prop the figure up & tape that into the bottom of your ornament. Add mini pom poms to, at least, cover Kirk's lower half. Close the ornament. Add ribbon in the top hole. Use like a snow globe, turning it over & then right side back again to watch all the Tribbles fall.
Notes:
A friend of mine merely sent me a photo of a completed ornament, thinking I would want to make it. I certainly did & just came up with my way, which I'm sure would be closest to how to original maker made their item. The ornament was a gift set with lip balm inside, & I knew it would be perfect for this, but they sell these at craft stores. I found the Tribble coloured mini pom poms at Dollar Tree (where everything's a dollar!) & I still have a lot left over.
You can choose an image from that episode where the Tribbles do fall on Kirk (like I did), or you could choose another character from that episode, or any character from Star Trek, original series or otherwise. You could even choose non-Tribble coloured pom poms. It's your ornament. And if you're not a fan of Star Trek, you could still make this. Perhaps the pom poms are pygmy puffs and you do a Harry Potter themed snow globe ornament? Or they could be Fizzgigs & you could do a Dark Crystal theme. Perhaps there's some other cute creatures of your imagination and you choose a Gnome? If you find white, it could be snow, & then you could just put anyone's picture inside including you or your kid or you cat. Just use your imagination!
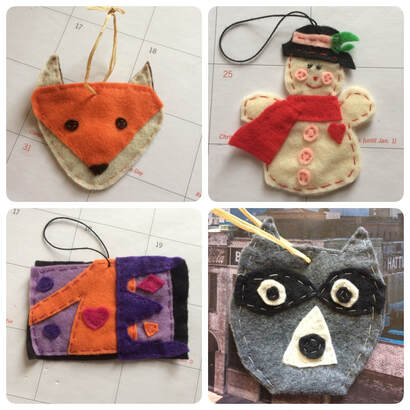
Flat Felt:
|
|
Supplies:
*Felt (whole or scraps)
*Scissors
*Sewing needle & thread (small)
*Larger sewing needle
*Ribbon, thread, raffia, etc.
----------------------------------------------------------------------------------------
*Sewing machine or hot glue gun (if you don't hand sew)
*Poly-fill (if you wish to slightly stuff them, do this before you completely sew the front & back pieces together)
Directions:
Decide on what you'll make & assemble felt pieces and scraps. You can create a woodland creature, a Christmas/Winter figure, or any scene of your choosing.
Cut two pieces for the main area (front & back). Cut smaller pieces to assemble on the top. Lay everything out how you wish & hold in place with one hand and sew around; sewing the front piece to the back piece, & also the smaller element pieces on top to only the top layer of felt. For a scene stitch stars or trees or extra elements onto the top portion only.
Once the piece is finished, create a hole in the top using a large sewing needle threaded with whatever you're using for ribbon/string. Thread that through & then remove the needle & tie a secure knot in the string.
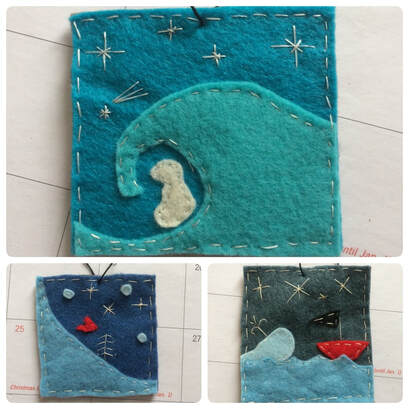
Notes:
These are my own design & as such I'm telling you how I hand sew these. You can use a machine if you're proficient with that, but these are rather small, about the size of your palm. If you'd rather use hot glue, you can, but you will not get stitched items like the stars, tree, or whale spray like in the second photo.
I use a lot of felt (ornaments, pouches, & plushies), so I have scraps large enough already for the ornament front & back, as well as randomly shaped scraps. A lot of elements on the purple/orange one on the right & all three on the left, were just odd looking scraps that I chose to assemble in certain ways or to make into a hill, an ice overhang, a whale, a polar bear, etc. It's fun to get creative with the random shapes or to even create something you already have in mind like a woodland creature or the snowman (which I copied from my own maternal grandmother's felt & sequin Christmas art of the 1960s).
*Felt (whole or scraps)
*Scissors
*Sewing needle & thread (small)
*Larger sewing needle
*Ribbon, thread, raffia, etc.
----------------------------------------------------------------------------------------
*Sewing machine or hot glue gun (if you don't hand sew)
*Poly-fill (if you wish to slightly stuff them, do this before you completely sew the front & back pieces together)
Directions:
Decide on what you'll make & assemble felt pieces and scraps. You can create a woodland creature, a Christmas/Winter figure, or any scene of your choosing.
Cut two pieces for the main area (front & back). Cut smaller pieces to assemble on the top. Lay everything out how you wish & hold in place with one hand and sew around; sewing the front piece to the back piece, & also the smaller element pieces on top to only the top layer of felt. For a scene stitch stars or trees or extra elements onto the top portion only.
Once the piece is finished, create a hole in the top using a large sewing needle threaded with whatever you're using for ribbon/string. Thread that through & then remove the needle & tie a secure knot in the string.
Notes:
These are my own design & as such I'm telling you how I hand sew these. You can use a machine if you're proficient with that, but these are rather small, about the size of your palm. If you'd rather use hot glue, you can, but you will not get stitched items like the stars, tree, or whale spray like in the second photo.
I use a lot of felt (ornaments, pouches, & plushies), so I have scraps large enough already for the ornament front & back, as well as randomly shaped scraps. A lot of elements on the purple/orange one on the right & all three on the left, were just odd looking scraps that I chose to assemble in certain ways or to make into a hill, an ice overhang, a whale, a polar bear, etc. It's fun to get creative with the random shapes or to even create something you already have in mind like a woodland creature or the snowman (which I copied from my own maternal grandmother's felt & sequin Christmas art of the 1960s).
